 An elastomeric roof coating can add an additional layer of protection to existing roof systems, stop leaks, increase energy efficiency, and extend a roof’s life expectancy.
Of course, proper application of an elastomeric roof coating is key to its effectiveness. When applied incorrectly or unevenly, it can leave vulnerabilities in the roof system that can be costly to fix later.
In this article, we will discuss some of the advantages and common applications of elastomeric roof coatings. We’ll also demonstrate the proper way to apply elastomeric coatings.
What is an Elastomeric Roof Coating?
An elastomeric roof coating is a liquid-applied coating (typically made from either silicone or acrylic) that cures into a durable, highly elastic membrane when it dries. The elastic quality makes it easy to apply to most roof surfaces and highly adaptable to a wide range of weather conditions.
Elastomeric roof coatings can be applied over new roofs to provide an extra layer of weatherproofing, or they can be applied to older roofs to seal leaks, reinforce the roof’s integrity, and extend lifecycle expectancy.
What Surfaces Can Elastomeric Coatings Be Installed Over?
Elastomeric roof coatings can be applied successfully over many different roofing materials, including (but not limited to) the following:
- Built-up roofing
- Asphalt
- Metal
- Fiberglass
- PVC
- APP or SBS cap sheet
- Aged EPDM or TPO membranes
- Concrete
- Exterior-grade plywood
- Sprayed polyurethane foam
- Existing elastomeric coatings
What are the advantages of Elastomeric Roof Coatings
- Increased energy efficiency and UV protection. Elastomeric roof coatings offer a “cool roof” effect that lowers energy bills in the summer months.
- Adds additional waterproofing and weathering protection. Elastomeric roof coatings provide a robust shield against rain, snow, ice, etc. They also provide additional reinforcement for roofs that may be subject to high winds.
- Easy to repair and maintain once installed. Vulnerabilities can be easily resealed by applying more coating directly to the areas of damage.
- Restores roof viability and extends the roof life expectancy. A well-applied elastomeric coating can last 10-20 years.
How to Apply Elastomeric Coatings
For proper application of elastomeric roof coatings, follow our how-to videos below for Liquid Applied Roofing (LAR):
Step 1: Gather Appropriate Tools and Equipment
The right tools and equipment will make applications easier and faster.
Aside from personal safety equipment like goggles, hard hats, work boots, gloves, and safety harnesses, you’ll want to gather solid plastic core roller covers, all-purpose brushes, scissors, mallets, push brooms, power drill with mixer, and sprayer equipment for your application process.
Step 2: Clean and Pressure Wash the Roof
Preparation is key to a successful coating application. Before applying the coating, the roof must be clean, dry, and structurally sound.
Remove all debris and dirt from the roof. For heavily soiled areas, loosen the dirt with a broom or brush. Clean the entire surface using a power washer capable of 2,500 to 3,500 p.s.i. with a 30-degree cleaning tip. Keep the tip about 18 inches from the roof surface and spray with a gentle sweeping motion. Use a push broom to push standing water toward the drains.
Allow the surface to dry completely before moving to the next step.
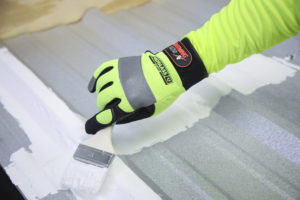
Step 3: Repair and Reinforce the Roof
Any areas of damage should be repaired before applying the elastomeric roof coating.
Use Polyglass PolyBrite polyester fabric and mastic to reinforce these repaired areas, as well as around any roof penetrations, curbs, and rooftop equipment.
To address inside corner details:
Apply a generous coat of Polyglass base coat to the inside corner, then embed reinforcing polyester fabric into the corner.
Once the fabric is smoothed into the corner and adhered to the base coat, apply more base coat to seal overlapping pieces of fabric, then cover the fabric area with a saturation coat.
To address outside corner details:
Apply a generous coat of Polyglass base coat to the outside corner, then embed reinforcing polyester fabric over the corner to adhere it, then apply a saturation coat. Then connect the details with an additional 12-inch piece of polyester fabric, applied in the same manner.
To address pipe penetration details:
For pipes, stands, drains, and scuppers that penetrate the roof surface, cut the polyester fabric for the finger flashing so the fabric can cover and overlap the pipe by at least 3 inches.
For the target flashing, cut an opening so the fabric can slide down over the drain pipe. Apply a base coat around the penetration area and work outward horizontally from the penetration point as well as up the pipe. Apply the finger flashing around the pipe, then apply an additional base coating to secure it. Fit the target piece over the pipe and apply a saturation coat.
If roof reinforcement is necessary:
Use a Polyglass base coat and 40-inch polyester fabric rolls to reinforce the roof area.
Apply the base coat using a roller, carefully unroll the fabric over the base coat to adhere it, then seal it with another layer of base coat. Overlap fabric rolls by at least three inches. When dry, the roof is ready for a topcoat.
To address metal seam flashing details:
For both vertical and horizontal metal seams, apply two coats of Polyglass PolyBrite 77 premium SCBS cement along the seams with a minimum of 2 inches on each side.
For complete encapsulation, apply an additional dab of cement over the screw heads.
Step 4: Conduct a Field Adhesion Test
Next, you’ll want to conduct a field adhesion test on the roof to determine which primer (if any) you need to apply.
For the test, you’ll attach a test piece of polyester reinforcing fabric by applying the primer, laying the fabric, and applying another coat of primer over it, leaving two inches of fabric free. Allow 24 hours to dry, then pull the fabric using the uncoated portion.
If the coating comes off the substrate clean, a primer will likely be needed; if primer is left on the surface, a primer may not be necessary.
Step 5: Mix and Stage Roofing Products
Mix all Polyglass products, including the elastomeric roof coating, thoroughly for proper application.
Use a 3/4-inch corded electric drill with a power mixer attachment and mix the product from the bottom up.
Stage all products out of direct sunlight and protect them from freezing.
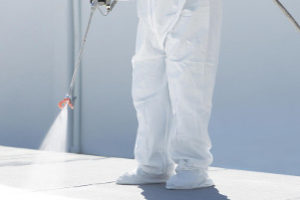
Step 6: Configure Spray Equipment and Apply
To apply the coating, use airless spray equipment with a minimum capability of 3/4 gallons of volume per minute and a minimum of 3,300 p.s.i.
Apply the coating evenly at the specified wet film thickness while keeping the nozzle 12-18 inches from the surface.
Learn more about liquid-applied roofing.